Mastering Pineapple Upside Down Cake: Tips & Ingredient Swaps
The allure of a perfectly baked pineapple upside down cake is undeniable. With its glistening caramelized fruit topping and tender, buttery cake base, it’s a dessert that evokes nostalgia and comfort in equal measure. Whether you’re an early bird baker, rising before dawn to fill your home with the sweet aroma of baking, or simply seeking a delightful treat for family and friends, understanding the nuances of this classic can elevate your baking from good to truly exceptional. This comprehensive guide will walk you through essential tips, clever ingredient swaps, and key techniques to help you master this beloved dessert, ensuring every slice is a taste of pure sunshine.
Mastering the Caramel Layer: The Heart of Your Pineapple Upside Down Cake
The iconic characteristic of a pineapple upside down cake lies in its rich, sticky caramel topping – often referred to as a "schmear" in professional kitchens. This foundational layer is where the magic truly begins, transforming simple ingredients into a complex, sweet, and slightly tangy glaze that infuses into the pineapple and cake during baking.
The classic schmear typically calls for unsalted butter, brown sugar, honey, a touch of rum, vanilla, and a pinch of sea salt. Each component plays a vital role:
- Unsalted Butter: Provides richness and helps create a smooth, emulsified caramel. Using unsalted butter allows you to control the overall saltiness of your cake.
- Light Brown Sugar: Contributes a deep molasses flavor and creates that signature golden-brown caramel. The moisture in brown sugar also helps keep the caramel pliable.
- Honey: Adds another layer of sweetness and a distinct floral note, enhancing the complexity of the caramel.
- Dark Rum: A traditional addition that lends a warm, sophisticated depth to the flavor profile. Even a small amount can significantly elevate the aroma.
- Vanilla Paste or Extract: Essential for its warm, inviting fragrance and flavor. Vanilla paste, with its visible flecks of vanilla bean, can also add an appealing visual element.
- Sea Salt: Crucial for balancing the intense sweetness of the caramel, preventing it from being cloyingly sweet and enhancing all the other flavors.
Ingredient Swaps for Your Schmear: Customizing the Caramel
Understanding the function of each ingredient opens the door to customization:
- Rum Alternatives: If you prefer to skip alcohol, as many do, you can easily omit the rum. A great alternative is to add a bit more vanilla extract or paste to deepen the aromatic notes. For a fruity twist, a splash of orange liqueur or even a tablespoon of pineapple juice can add a bright, non-alcoholic flavor without compromising the caramel’s texture.
- Sweetener Variations: While brown sugar is standard, you can experiment. A mix of light and dark brown sugar offers an even richer molasses flavor, or a small portion of granulated sugar could be introduced for a slightly different caramel consistency. For the honey, maple syrup could provide a distinct, earthy sweetness, though it would alter the traditional flavor profile.
- Flavor Enhancers: Consider a tiny pinch of cinnamon, nutmeg, or even a dash of cardamom to add an unexpected warm spice note to your caramel layer, especially when pairing with the tropical pineapple.
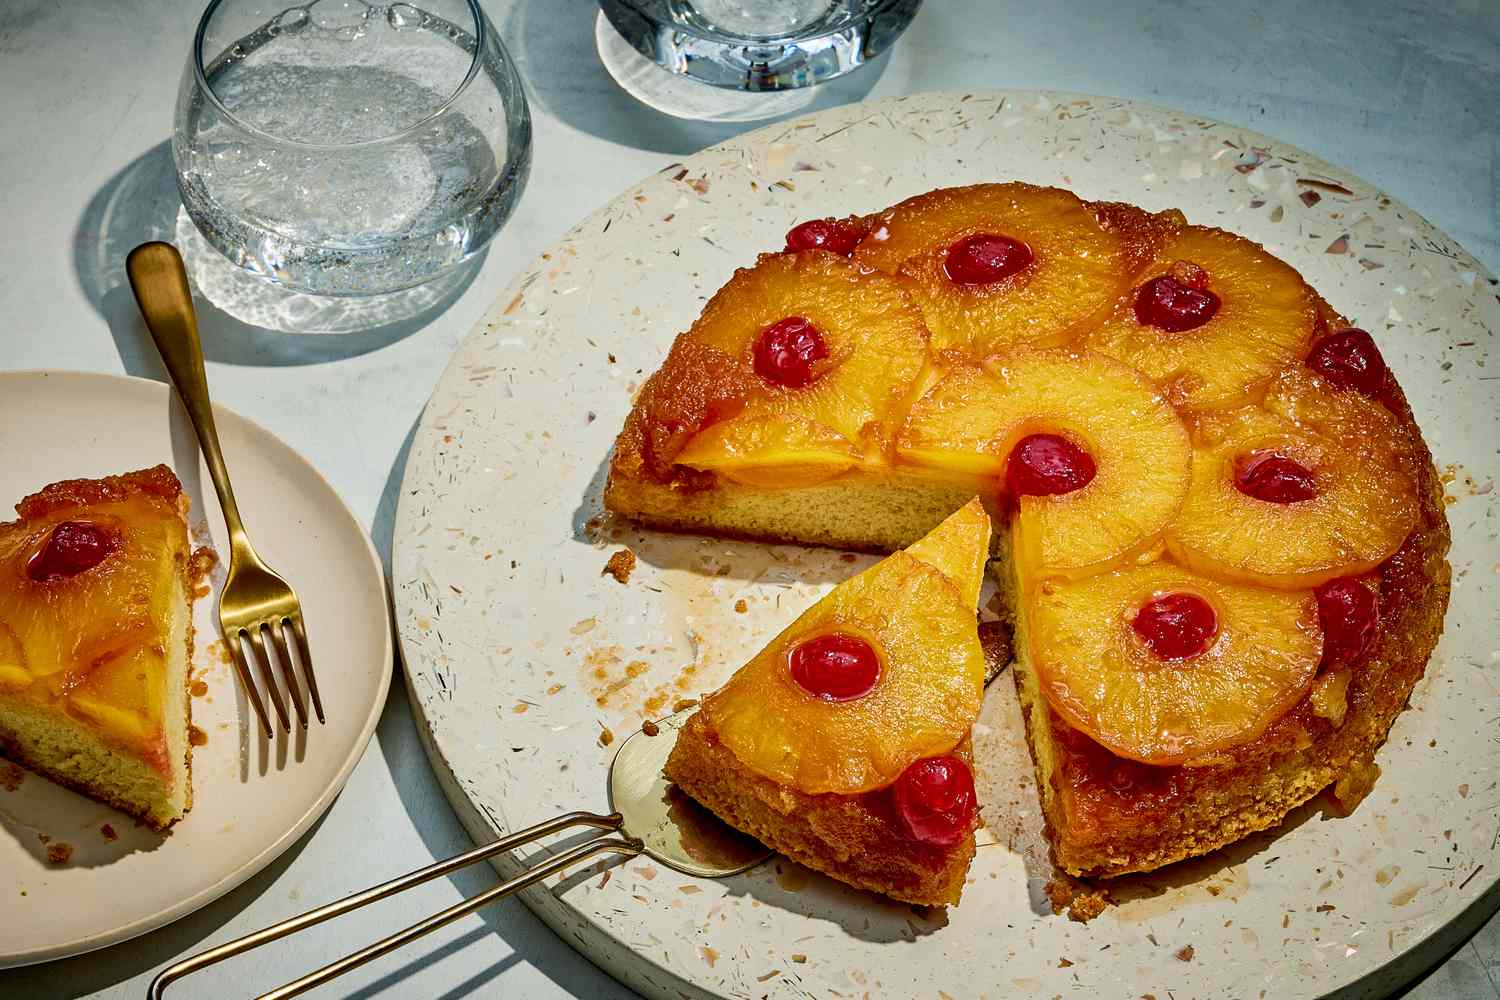
Once your schmear is ready, it's generously spread across the bottom of your chosen pan. This is then followed by the carefully arranged pineapple slices. Thomas Keller's recipe, for instance, calls for "Gold" or extra-sweet pineapples, highlighting the importance of ripe, flavorful fruit. For preparation, start by cutting off the top and bottom, peeling away the skin, then quartering and coring the pineapple. Slicing these quarters crosswise into ¼-inch thick pieces ensures even baking and a beautiful presentation. The classic arrangement involves overlapping rings, starting from the perimeter of the pan and working inward, creating a stunning mosaic when the cake is inverted.
Crafting the Perfect Cake Batter & Baking Techniques
Beyond the caramelized fruit, the cake itself is paramount – it needs to be tender, moist, and perfectly balanced to complement the sweet topping. The base for a classic pineapple upside down cake often uses a creaming method, which is fundamental for achieving a light and airy crumb.
Key Batter Ingredients and Their Role:
- Cake Flour: This is a crucial ingredient for a truly tender crumb. Cake flour has a lower protein content than all-purpose flour, which results in less gluten development and a softer texture. If you don't have cake flour, you can create a reasonable substitute by combining 1 1/3 cups of all-purpose flour with 2 tablespoons removed, and replacing that with 2 tablespoons of cornstarch, then sifting them together.
- Baking Powder: The primary leavening agent, providing the necessary lift to the cake for a light texture.
- Unsalted Butter & Granulated Sugar: These are creamed together first. The process of beating butter and sugar together incorporates air, which is vital for the cake's structure and lightness. The butter should be at room temperature to cream properly.
- Vanilla Paste or Extract: Adds depth and warmth to the cake's flavor.
- Eggs: Act as binders and contribute to the cake's structure and richness. Adding them one at a time ensures they are fully incorporated without deflating the creamed butter and sugar.
- Milk: Provides moisture and helps create a tender crumb.
Ingredient Swaps and Flavor Variations for the Batter:
- Butter: If using salted butter, simply reduce the amount of added salt in the recipe. For a dairy-free version, a high-quality plant-based butter substitute can work effectively.
- Milk: Buttermilk can be used instead of regular milk for a slightly tangier flavor and even more moist crumb. Non-dairy milks (like almond or oat milk) can also be used for dietary reasons.
- Flour: While cake flour is preferred, all-purpose flour can be used if that’s all you have; the cake might be slightly denser, but still delicious.
- Spices: A pinch of cinnamon, nutmeg, or ginger added to the dry ingredients can infuse the cake batter with a subtle warmth that complements the pineapple beautifully.
Baking Techniques & Pan Choice: Cast Iron vs. Silicone
Preheating your oven to 350˚F (175˚C) is non-negotiable for even baking. Once the batter is poured over the pineapple, the cake bakes for approximately 30-40 minutes, with a rotation midway through (around 15 minutes) to ensure uniform browning. The cake is done when it’s golden brown, springs back lightly when touched, and a toothpick inserted into the center comes out clean.
A significant point of discussion among bakers, particularly when following renowned recipes like Thomas Keller's, is the choice of baking pan.
- Silicone Cake Pan: Keller's recipe specifically calls for a silicone pan, primarily for its ease of release. For bakers who might be "uncomfortable with tipping a cake, dripping with hot caramel, out of a cast iron pan and on to a plate," silicone offers a virtually foolproof method. Its non-stick nature ensures the caramelized topping slides out effortlessly, making for a cleaner and less stressful transfer.
- Cast Iron Skillet: Despite the modern recommendation, many bakers (including the one in our reference context) prefer baking pineapple upside down cake in a cast iron skillet. The undeniable advantage of cast iron is its superior heat retention and distribution. This results in a deeper, more intensely caramelized crust on the pineapple and a wonderfully crisp edge on the cake, imparting a rustic charm and depth of flavor that some argue silicone can't quite replicate. While flipping from cast iron requires a bit more confidence and a good, sturdy serving plate, the results are often deemed worth the effort. For a deeper dive into this comparison, explore our guide on Bake Thomas Keller's Pineapple Upside Down Cake: Cast Iron vs. Silicone.
Quick & Convenient: Mini Pineapple Upside Down Cakes and Air Fryer Magic
While a full-sized pineapple upside down cake is a grand statement, sometimes you need a dessert that’s quicker, easier, and perfectly portioned. This is where mini pineapple upside down cakes, especially when made in an air fryer, shine. These delightful individual portions are ideal for last-minute cravings, small gatherings, or even adventurous camping trips.
The beauty of the mini version lies in its simplicity and versatility. By utilizing store-bought sponge cakes (such as individual round sponge cakes or even slices from a larger one cut with a cookie cutter), you bypass the need to make batter from scratch. This significantly cuts down on prep time and specialized equipment, making it an incredibly accessible dessert for bakers of all skill levels.
The process for mini cakes is similar in concept to the traditional method:
- Prepare a scaled-down version of the caramel schmear.
- Place a small amount of caramel at the bottom of individual baking cups or air fryer-safe ramekins.
- Top with a small pineapple ring or chunk.
- Place the store-bought sponge cake on top.
- Bake until golden and caramelized.
The air fryer is a game-changer for these mini treats, offering rapid cooking and excellent caramelization with minimal fuss. This method is particularly fantastic for situations like camping, where access to a traditional oven might be limited, but a portable air fryer could be on hand. No need for extensive clean-up or multiple baking tools – just a quick, satisfying dessert. For a detailed guide on whipping up these speedy delights, check out our article on
Quick Mini Pineapple Upside Down Cakes in Your Air Fryer.
Tips for a Flawless Flip and Serving
The moment of truth for any pineapple upside down cake is the flip. A successful inversion reveals the glistening, fruit-laden masterpiece beneath. To ensure a smooth transition:
- Cool Slightly: Do not attempt to flip the cake immediately after removing it from the oven. Let it cool in the pan on a wire rack for about 5-10 minutes. This allows the caramel to set slightly but remain fluid enough to release from the pan. If you wait too long, the caramel might harden and stick.
- Prepare Your Plate: Choose a serving plate that is larger than your cake pan. This provides a margin for error and catches any drips of caramel.
- The Flip: Place the serving plate upside down over the top of the cake pan. Using oven mitts for protection, firmly hold both the pan and the plate together and, in one swift, confident motion, invert them.
- Gentle Release: Allow the cake to sit on the plate for another minute or two. Gravity will help the caramel and fruit completely release from the bottom of the pan. Gently lift the pan. If any fruit pieces stick, carefully reattach them to the cake.
Serving pineapple upside down cake warm is often considered the best way to enjoy it, especially with a fresh cup of coffee, as described by one enthusiast. The warm cake and melted caramel are heavenly. To elevate the experience further, consider serving it with a scoop of vanilla bean ice cream, a dollop of freshly whipped cream, or a drizzle of extra caramel sauce. The contrast of the cool topping with the warm cake is simply divine.
Ultimately, baking a pineapple upside down cake is a rewarding experience. From selecting the perfect pineapple to mastering the caramel, each step offers an opportunity for creativity and a deeper connection to the art of baking. By understanding the core techniques and feeling empowered to experiment with ingredient swaps, you can truly make this classic dessert your own. So go ahead, preheat your oven, gather your ingredients, and prepare to delight in the timeless charm of a homemade pineapple upside down cake.